
Introduction
When working with PLA filament, finding the perfect balance between printing fast and keeping details sharp is the ultimate goal.
The ideal speed depends on your 3D printer type, nozzle size, cooling capabilities, and print temperature. Get this right, and you’ll get flawless prints every time. In this comprehensive guide, we will break down everything you need to know about setting the right print speed for your PLA printing filament.

What is PLA Print Speed?
In 3D printing, PLA print speed refers to the velocity at which the printer nozzle moves while extruding plastic. It is measured in millimeters per second (mm/s).
Speed Ranges for PLA Filament
| Speed Category | Speed Range | Common Printer Types / Setups |
|---|---|---|
| Standard Speed | 40 – 60 mm/s | Entry-level bed-slingers (e.g., Ender 3, Anycubic Kobra) |
| Moderate Speed | 60 – 100 mm/s | Modern mid-tier printers with upgraded cooling |
| High Speed | 150 – 300+ mm/s | CoreXY machines (Bambu Lab, Voron) using High-Speed PLA |
Different Speed Settings in Slicer
In slicers like Cura or Bambu Studio, one ‘speed’ setting hides a whole team of individual controls:
- Outer Wall Speed: The speed for visible exterior surfaces. Slower speeds (e.g., 30–50 mm/s) yield smoother walls and cleaner details.
- Inner Wall Speed: The speed for interior perimeters. This can run 50% faster than outer walls because visual flaws do not show on the outside.
- Infill Speed: The speed for printing the internal support structure. Since infill is hidden, this is usually your fastest setting.
- First Layer Speed: The speed for the very first layer laid onto the print bed. Usually kept low (20–30 mm/s) to ensure maximum bed adhesion.
- Travel Speed: The speed at which the toolhead moves when not extruding filament. High travel speed prevents stringing and reduces total print time.
How Print Speed Impacts Your PLA Prints
Changing your PLA print speed affects far more than just your print duration. It creates a ripple effect across physical quality, part strength, and hardware performance.
1. Impact on Print Quality
As speed increases, print detail generally drops. Fast directional changes create mechanical vibration. This vibration causes surface artifacts like ringing (ghosting), rounded corners, and uneven layer lines.
2. Impact on Mechanical Strength & Layer Adhesion
Notice your prints snap too easily along the layer lines? You’re probably printing fast but cold. Molten PLA needs a fraction of a second to fuse with the layer below. Speed past your filament’s melting capacity, and you’ll build in structural weakness—like laying bricks with half-dry mortar.
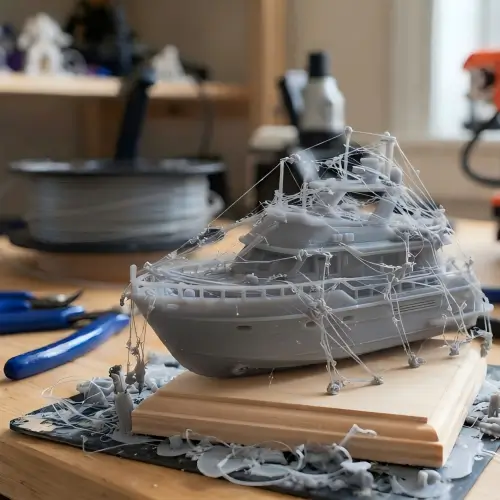
3. Impact on Stringing and Oozing
Faster speed requires precise control of the nozzle pressure. If travel movements happen while residual nozzle pressure is high, the molten material will drip out, causing thin webs of filament across gaps.
4. Impact on Hardware & Maintenance
Running your 3D printer at high speeds subjects belts, stepper motors, linear rails, and frame joints to higher forces. Fast speeds demand properly tensioned belts, adequate lubrication, and sturdy printer frames.
5. Impact on Print Time
Doubling your speed in the slicer rarely cuts your total print time in half. Acceleration, jerk, layer warm-up limits, and short perimeter paths often cap how fast your printer actually moves.
When Slower Is Actually Faster: 7 Warning Signs of Excessive Speed
If your speed settings exceed what your hardware or material can handle, you will end up with failed prints. Restarting prints wastes more time than printing slower from the start. Watch out for these 7 warning signs:
- Under-Extrusion: Thin, patchy layers, or microscopic gaps in top surfaces.
- Layer Separation: Prints splitting apart easily along horizontal layer lines.
- Surface Ripples (Ghosting): Echoing patterns near sharp corners or text on the model.
- Corner Bulging: Sharp 90-degree corners appearing rounded or swollen.
- Excessive Stringing: Fine spider-webbing across open spaces.
- First-Layer Detachment: The print lifting off the build plate mid-job.
- Extruder Clicking: The extruder gear slipping or grinding into the filament because the hotend cannot melt plastic fast enough.
Factors That Affect PLA Print Speed
Why can one printer run PLA filament at 200 mm/s while another struggles at 60 mm/s? The answer lies in several mechanical and physical limits.
| 1. Hotend Volumetric Flow Rate | Heat-transfer speed limit |
| 2. Extruder Torque Limit | Pushing force limit |
| 3. Cooling Capability | Solidification time limit |
| 4. Firmware Acceleration & Jerk | Physical inertia limit |
| 5. Material Formulation | Polymer melt dynamics |
1. Printing Temperature
Speed and print temperature go hand in hand. Faster extrusion moves material through the heating zone quicker. To melt plastic faster, you must raise the temperature. However, raising heat too much risks heat creep (jamming the cold side of the hotend) or excessive oozing.
2. Filament Types & Diameter Tolerance
Standard PLA filament has a limited melt index designed for traditional print speeds. If you want to print above 150 mm/s, consider specialized High-Speed PLA or Tough PLA.
In addition, consistency is equally important. Diameter fluctuations of just 0.05 mm can cause visible under-extrusion bands every few layers, ruining an otherwise perfect print. Using a high-quality PLA filament bundle from a trusted brand ensures uniform diameter tolerance and consistent results over long prints.
3. Hotend Volumetric Flow Rate
Volumetric flow rate measures how many cubic millimeters (mm³) of plastic your hotend can melt per second. Think of this as your printer’s horsepower limit. You can’t push filament through your nozzle faster than your hotend can melt it.
A standard hotend melts about 10-15 mm³ of plastic per second—enough for a pea-sized amount. High-flow setups like a Volcano nozzle triple that capacity, handling 25-40 mm³/s.
4. Extruder Torque Limit
When you try to push filament faster than the hotend can melt it, backpressure builds inside the melt zone. If this backpressure exceeds the torque limit of your extruder motor, the gears will click and skip steps, causing under-extrusion.
5. Cooling Capability Limit
PLA requires rapid cooling immediately after leaving the nozzle to solidify bridge layers and overhangs. If your part cooling fan cannot cool the plastic fast enough, high-speed prints will sag, warp, and turn mushy.
6. Acceleration and Jerk Settings
Slicer speed is a target, not a guarantee. If your acceleration limit is set low (e.g., 500 mm/s²), the printer toolhead may never hit your set 100 mm/s speed on smaller print geometry because it runs out of distance to accelerate and decelerate.
7. Model Geometry
Complex models with intricate details, small islands, or steep overhangs force the printer to slow down. Broad shapes with straight, long paths allow the toolhead to reach high speeds safely.
Recommended Print Speed Ranges for PLA
Use these baseline settings tailored to nozzle size and layer height to dial in your standard setup.
Print Speed Based on Nozzle Size (at 0.2mm Layer Height)
| Nozzle Size | Recommended Wall Speed | Recommended Infill Speed | Max Volumetric Flow Limit |
| 0.4 mm (Standard) | 40 – 80 mm/s | 60 – 120 mm/s | ~12–15 mm³/s |
| 0.6 mm (High Flow) | 30 – 60 mm/s | 50 – 90 mm/s | ~15–20 mm³/s |
| 0.8 mm (Max Volume) | 20 – 40 mm/s | 35 – 60 mm/s | ~20–25 mm³/s |
Note: Larger nozzles extrude wider tracks of plastic. Even though speed in mm/s appears lower on 0.8mm nozzles, the machine actually extrudes far more material per second.
Adjusting Print Speed for Different Layer Heights
- Fine Detail (0.12 mm Layer Height): Reduce speed to 30 – 50 mm/s. Lower layer heights capture small details best when printed slowly.
- Standard Balance (0.20 mm Layer Height): Ideal at 50 – 90 mm/s. Offers the best balance between surface finish and build time.
- Draft Mode (0.28 mm Layer Height): Drop speed slightly to 40 – 70 mm/s. Thick layers demand high volumetric flow, which can overload standard hotends if driven too fast.
Why 60 mm/s is Not the Universal Sweet Spot
For years, “60 mm/s” was the standard recommendation for 3D printing. However, modern high-speed kinematics, lighter toolheads, and advanced firmware input shaping have changed the baseline. Modern desktop machines routinely print top-quality PLA 3D Printing filament at 150 mm/s to 300 mm/s without sacrificing visual quality.
How to Find the Best PLA Print Speed Without Wasting Filament?
Instead of guessing speed settings, follow this step-by-step calibration method to find your hardware’s speed threshold quickly.
  5-Step Speed Calibration Workflow

Step 1: Set Baseline from Manufacturer Specs
    │
    ▼
Step 2: Print Speed Calibration Tower / Test Cube
    │
    ▼
Step 3: Scale Print Temperature with Speed (+5°C per 20-30 mm/s)
    │
    ▼
Step 4: Lock in First Layer Speed (20-30 mm/s)
    │
    ▼
Step 5: Maintain Consistent Spools (Use matching PLA filament bundle)
Step 1: Start with Manufacturer Recommendations
Check the spool label for your PLA filament. Note both the suggested printing speed range and the recommended print temperature (typically 190°C – 220°C).
Step 2: Print a Speed Calibration Tower
Download a Speed Tower or Speed Test Cube from your favorite 3D model repository. Set your slicer to increase speed by 10 or 20 mm/s every few millimeters in height. Inspect the finished tower for visual defects, under-extrusion, or poor layer adhesion.
Step 3: Adjust Temperature Alongside Speed
As you push speed higher, increase your temperature to melt plastic faster.
Rule of Thumb: Increase your print temperature by approximately 5°C for every 20–30 mm/s increase in print speed.
Step 4: Fine-Tune First-Layer Speed
Never speed up your first layer. Set your initial layer speed to 20–30 mm/s with a slightly higher bed temperature and turned-off cooling fan. A solid first layer guarantees reliable print adhesion for the rest of the job.
Step 5: Keep Your Setup Consistent
Filament properties vary slightly across different brands and color pigments. Stocking up on a uniform PLA filament bundle lets you keep calibration settings identical across multiple projects without tuning every spool from scratch.
Unlock Extra Speed Without Sacrificing Quality
Want to push your printer past standard limits while preserving clean details? Focus on these three areas:
| Cooling Power | Retraction | Input Shaping |
| Dual-fan duct, 100% fan speed | Tuned distance & rapid prime | Compensates for motor vibration |
1. Upgrade Cooling Strategy
When printing fast, molten material must cool rapidly before the next layer arrives. Upgrade stock cooling fans to dual-fan configurations or high-static-pressure blower fan ducts. Set part cooling fan speed to 100% after the second layer.
2. Recalibrate Retraction
Fast print moves increase fluid pressure in the melt zone, raising the risk of stringing during travel moves. Slightly increase retraction speed and fine-tune retraction distance to match your higher movement speeds.
3. Tune Acceleration and Leverage Input Shaping
High travel speed causes mechanical vibration. If your machine runs modern firmware like Klipper or modern Marlin, calibrate Input Shaping (Resonance Compensation). Input shaping uses accelerometers to predict printer vibration and cancel it out. This lets you run higher acceleration values without creating surface ghosting or ringing.
What Your Failed PLA Prints Are Trying to Tell You About Speed
When high-speed prints fail, the symptoms show you what settings need adjustment.
| Print Symptom | Likely Speed-Related Cause | Quick Fix |
|---|---|---|
| Layer Splitting / Cracking | Speed is too high for the current print temperature | Lower print speed or increase hotend temperature by 5–10°C |
| Corner Bulging | Acceleration is too high or part cooling is insufficient | Lower corner acceleration/jerk or increase cooling fan output |
| Surface Ripples / Ghosting | Mechanical vibration at high movement speeds | Lower outer wall speed/acceleration or calibrate Input Shaping |
| Severe Stringing & Oozing | Retraction settings are not optimized for rapid travel | Increase travel speed and fine-tune retraction distance |
| Warping / Bed Detachment | First layer printed too fast | Reduce first-layer speed to 20–25 mm/s; consider a 5 °C bed temperature boost for the first layer |
Conclusion
Finding the ideal PLA print speed comes down to systematic testing:
- Establish a baseline speed based on your machine type and nozzle diameter.
- Identify hardware limits, focusing on hotend flow rate and part cooling.
- Run calibration prints using your chosen PLA filament.
- Scale up print temperature as you increase movement speed.
- Read print defects to troubleshoot and fine-tune your slicer profile.
By balancing material flow, heat, and movement settings, you can shorten print times while maintaining smooth surface finishes and strong layer bonding on every project.